Archive | October 2012

Lemon Lentil Soup

Lentils are such a great source of fiber and protein that I’ve made a personal goal to get them into more dishes. What I’ve noticed is that you can easily sneak them into things because when they cook they just sort of.. blend in. I understand that’s a terrible description, but you’ll have to cook them and see for yourself!  This soup was really tasty and fresh.  I froze the leftover servings and really look forward to having it again on a cool winter night.

Lemon Lentil Soup– slightly adapted from The big book of little lentils

Serves: 6

2 tsp. olive oil

1 white onion, chopped

2 cloves garlic, minced

1/4  tsp. crushed red pepper flakes (do 1/2 tsp if you like spicy)

1/2 tsp. ground cumin

1.5 cups dry split red lentils (I used Goya brand), cleaned and rinsed

6 cups reduced sodium chicken broth

2 tbsp. fresh lemon juice

2 tsp. dried parsley (or 2 tbsp. fresh)

salt and pepper to taste

Instructions:

  1. Heat oil in a large pot
  2. Add onion and saute 4-5 minutes until translucent.  Add garlic and red pepper flakes and cook an additional minute
  3. Add cumin and lentils, combine well.  Add chicken broth, salt and pepper and bring to a boil
  4. Reduce heat, cover and simmer until lentils are tender and soup is beginning to thicken, about 30 minutes
  5. Add lemon juice and serve with parsley sprinkled on top and 3 (1 oz) slices of ciabatta bread

Nutrition Facts (per serving without the bread): 193 calories, 13g protein, 28g carbohydrate (9g dietary fiber), 3.4g fat (.7g saturated)

Roasted Fall Vegetable Couscous

This dish might be my new favorite side dish of all time.  It was so warm and comforting on a crisp fall night.  The vegetables get really rich and flavorful as they roast, and the butternut squash becomes slightly creamy (delish!).  This would be a great healthy Thanksgiving side dish to add into the usual mix this year.  You can also just eat it as a main course too, but I paired it with a piece of fish to make up for the missing protein. This kind of recipe makes me so happy, kind of like I’m kicking McDonald’s in the tush.  A recipe like this with only 1g saturated fat can be mouth watering and delicious with the right ingredients and seasonings.  Please, make this.  You won’t be sorry!

Roasted Fall Vegetable Couscous- adapted from Yes, I want cake

Serves: 4 as main course – 6 as side dish

1 pint heirloom grape tomatoes, halved

1 medium butternut squash, peeled and diced

1 medium zucchini, diced

1 c pearled (Israeli) whole wheat couscous

1 1/4 cup reduced sodium chicken broth

1/4 cup + 2 Tbsp. extra virgin olive oil (divided)

1 tsp. Italian seasoning

1/3 white onion, diced

3 garlic cloves, minced

salt and pepper to taste


Instructions:

  1. Preheat oven to 450 degrees
  2. Place diced butternut squash on a large cookie sheet.  Drizzle squash with 1 T olive oil, Italian seasoning, and a sprinkle of salt and pepper.  Make sure the squash is evenly coated (you may want to use your hands).  Roast in oven for 20 minutes.
  3. After 20 minutes, add diced zucchini, halved tomatoes and additional 1 T olive oil to the cookie sheet.  Roast for another 15 minutes.
  4. Bring chicken broth to a boil in a medium sized pot.  Once broth is boiling, add couscous, cover, turn heat to low and cook according to package directions (mine was done in about 10 minutes).
  5. While couscous and veggies are cooking, heat 1/4c olive oil in a small skillet over medium heat. Once hot, add diced onions and cook 7-8 minutes until translucent and starting to caramelize.  Then add garlic and cook an additional minute.
  6. When all have finished cooking, mix roasted veggies with couscous and pour onion/garlic/olive oil mixture over the top.  Mix well and serve.

Nutrition Facts (serving based on side dish portion): 270 calories, 11.5g fat (1 g saturated), 38.6g carbohydrate (4g fiber), 5 g protein

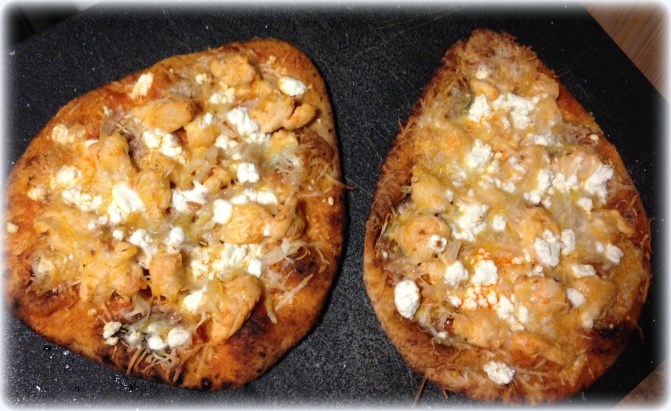
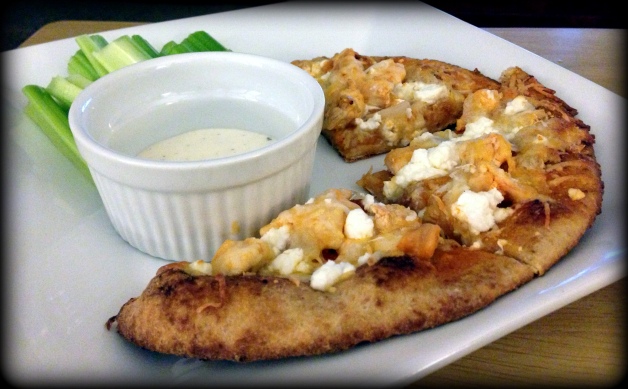
Buffalo Chicken Pizza on Whole Wheat Naan

“Football food”… a man’s excuse for eating like a pig and sitting on the couch the entire Sunday.  Let me just say that if you’re only moving in a 10 hour period to go to the bathroom, I would recommend not downing a bag of chips and salsa like it’s water!

As much as I hate “football food,” it’s inevitable, and if it’s going to happen, you might as well adapt some traditional recipes to add a little more fiber, a little less fat, and a little more protein.  This recipe isn’t the healthiest of my creations, but it IS better then deep fried chicken wings, a pepperoni pizza or a large bag of chips.  It’s also pretty tasty too!

Buffalo Chicken Pizza on Whole Wheat Naan -adapted from TastefullyJulie

Serves 5 (3/4 naan per serving)

4 pieces of whole wheat naan bread

2 boneless skinless chicken breasts, cubed into 1″ pieces

2 tsp. extra virgin olive oil

1/3 cup Franks hot sauce

5 tbsp. Smart Balance- Heart Right Light buttery spread

1 cup reduced fat Mexican blend cheese

3 oz crumbled feta cheese

1/2 white onion, thinly sliced

Instructions:

  1. Preheat oven to 425 degrees.  Line two large cookie sheets with aluminum foil and set aside.
  2. Heat 1 tsp. olive oil in a non-stick skillet.  Once hot, cook cubed chicken breast 5-7 minutes until done.
  3. While chicken is cooking, place 5 tbsp smart balance into a microwave safe bowl and microwave 25-30 seconds until it starts to melt.  Remove from microwave and mix with Franks hot sauce.  Set aside.
  4. Once chicken is cooked, add to the sauce mixture.  Mix and then lift chicken out with a slotted spoon, draining off excess sauce.  Set chicken aside.
  5. Re-heat the non-stick skillet with remaining teaspoon of olive oil.  Saute sliced onion 4-5 minutes until translucent.
  6. Place two pieces of naan on each cookie sheet.  Take the remaining sauce and divide equally between the four pieces.  Top with equal amounts of chicken, Mexican cheese, feta cheese, and onion.  *There should be a perfect amount to equally cover each of the 4 mini-pizzas.
  7. Bake for 11 minutes until cheese is bubbly and naan is crispy.  Serve with celery sticks and light ranch dressing to keep with the theme!

Nutrition Facts (based on 3/4 naan per serving): 533 calories, 21g fat (7g sat fat), 43.6g carbohydrate (6.2g fiber), 37.5g protein

Ellie Krieger’s Skillet Mac & Cheese (with cauliflower!)

This one is in honor of my new Ellie Krieger cookbook that I just love, “Comfort Food Fix.”  I’ve always wanted to try cauliflower in mac & cheese to bulk up the vegetable content (that is otherwise non-existent!) and slim down the high saturated fat cheese part.  I would say that you must have an open mind, and realize that it’s not going to be quite as cheesy and creamy as your traditional dish, but remind yourself that it’s a much healthier version.  It’s also great for kids (or picky spouses!) because you can dice the cauliflower small enough to disguise it under the cheese.

I made a few small changes to the recipe, but it is entirely Ellie’s creation that I just had to share with you!  Due to copyright laws I’m going to link you right over to her website since I only made a few slight changes to the recipe.  You can see my changes below, and reference the website provided for the full recipe and nutrition information as it will only be slightly off from mine.

Ellie Krieger’s Skillet Mac & Cheese (with cauliflower!)

In my version I altered the ingredients as the following:

6 ounces (1 ½ cups) whole grain elbow macaroni, cooked according to package directions (about 3 cups)
3 cups 1-inch wide cauliflower florets
1 ¼ cups Light and Crisp Whole Wheat Bread Crumbs (see recipe in above link)
3 tablespoons freshly grated parmesan cheese
2 teaspoons olive oil
3 cups cold 1 percent low-fat milk
3 tablespoons all-purpose flour
1.5 cups shredded reduced fat sharp cheddar cheese
2 teaspoons mustard powder
½ teaspoon salt
½ teaspoon freshly ground black pepper
¼ teaspoon cayenne pepper
Cooking Spray

Instructions can be found using the above link.  My only alteration was using a 9 x 13 glass baking dish instead of a skillet.

Nutritional Information can be found at the link as well.

Enjoy!

FNCE Recap

I had optimistically planned to get in my Thursday post this week after FNCE (Food & nutrition conference and expo) and then school slapped me in the face.  As much as I love cooking and sharing new recipes here, school needs to come first (just for two more months!).  FNCE was great, while I learned a lot at the educational sessions, I didn’t think anyone reading would care too much about that.  In the expo hall, hundreds of companies came to share their products with us and give away free samples.  I had a lot of fun with this, and now have more food then I could ever eat!

My favorite free giveaway is at the bottom. Ellie Krieger’s new cookbook… and I got to meet her!

As for the samples, I’ve only tried a few of them so far, but I wanted to discuss the ones I did here as it may be helpful to you as a consumer.  I will add more as a go through my loot over the next month (or two!).
1)  Luna fiber bar- peanut butter strawberry

This bar REALLY surprised me.  I thought for sure that the weird combination of flavors would make me nauseous.  But I LOVED it.  Flavor wise, it gets an A.  It also has 7g of fiber which is good.  The ingredients list is long, which is usually a red flag, but after looking at them nothing was too alarming. They use all organic ingredients.. which, to be quite honest, doesn’t mean much to me in a bar.  If it has 11g of sugar, it has 11g of sugar, I don’t care where it came from. It’s not good for you either way.  The one good part though were the organic strawberries.  Since they are on the “dirty dozen” list, that’s a nice plus.  Overall: Would definitely buy again!

2) Jamba Granny Smith Apple Snacks

I may be biased because I am not the hugest fan of granny smith apples in the first place, but I was not a fan of these either.  Too tart for me.  I do however FULLY support the ingredient list: apples. Overall: Not for me, but could be for you!

3) Laughing Cow- Light Mozzarella, Sun-Dried Tomato & Basil Cheese Wedges

This was SO good.  Each wedge comes in at only 35 calories and it would be a great cheese to spread on a whole wheat cracker.  Before FNCE I never would have thought to pick up laughing cow, but after trying this flavor and a few others, I will definitely be becoming a new customer! Overall: Delicious

4) Food Should Taste Good- any flavor

I loved this brand way before FNCE, but they were there and I want to spread the word about how great these chips are.  Their ingredient list includes flax seed, quinoa, canola oil and brown rice flour to name a few.  It is also certified Gluten Free which makes it a great healthy alternative for those people suffering from Celiacs disease or a gluten intolerance.  Gluten free products have fantastic advertising, I will give them that.  They usually show-boat themselves as a healthier alternative to non-gluten free snacks.  What’s a shame is that being gluten free has become quite a fad, and those falling for the fad are not educated on the correct science (key phrase!) behind a gluten intolerance.   If you look closely, a lot of G-free products are in fact much worse for you then their non-Gfree alternatives.  It is a shame for those that actually suffer from the disease, and Food Should Taste Good did an awesome job of making their product gluten free while also incorporating wonderful whole grains not containing gluten (i.e. quinoa!).  This is a gluten free snack I can definitely get on board with! Overall: Love it!
5) Smartfood Selects- Cinnamon Brown Sugar Popcorn

I think I visited this station 3 times a day at the expo.  I mean, this stuff is delicious, and I promise they are not paying me to say that.  The product contains 9g of fat per ounce.  While 7.5g of that is unsaturated fats, I still think that’s a little too high.  To give you a reference, 1 oz of Lays potato chips will run you 10g of fat.  This popcorn should be more of a treat, not an every day item.  I fear you’d also become addicted if it was! Overall: Awesome, in moderation.

Disclaimer:  These opinions are entirely my own, I was not paid or compensated in any way to review these products.

Grandma Rita’s Pumpkin Bread

I need to start by saying that this recipe is not healthy, and I’m not going to pretend that it is.  Is it delicious? SO delicious.  Usually when I have a recipe like this, I alter the crap out of it.  In this case, it is something I always look forward to at this time of year and it was my grandmothers recipe.  Since I wasn’t fortunate enough to meet her, her pumpkin bread in October makes me feel like I have a little piece of her, and I just can’t bring myself to alter it.  Living a healthy life is all about moderation, which means choosing some indulgences once in a while.  This, is one of mine.

Grandma Rita’s Pumpkin Bread

Makes: 3 loaves (about 10 slices per loaf)- the loaves freeze well so enjoy one and freeze the others for later in fall!

2 cups 100% pure pumpkin

2 cups sugar

4 eggs

1 cup vegetable oil

1 cup water

1.5 tsp. salt

1 tsp. ground cloves

1 tsp. ground nutmeg

1 tsp. ground cinnamon

2 tsp. baking soda

1/2 tsp. baking powder

cooking spray

3- 9 x 5 aluminum loaf pans

3 1/3 cups all-purpose flour

Ingredients:

  1. Combine the salt, ground cloves, ground nutmeg, cinnamon, baking soda, baking powder and flour in a bowl.  Stir together with a wire whisk and set aside.
  2. Blend the pumpkin, sugar, eggs, oil and water in a mixer on medium for a few minutes until combined.  Set the mixer on low and slowly add the dry ingredients.  Turn the mixer back up to medium until all is combined.
  3. Dust the loaf pans with cooking spray, then add a little flour to coat the inside of each pan.
  4. Pour the batter evenly between the three loaf pans.  Bake at 350 degrees for anywhere from 55 to 75 minutes. Cover each bread very lightly with aluminum foil after 45 min., so the top doesn’t burn, then continue cooking.
  5. The breads are done when the toothpick comes out dry after testing from the middle of the loaf.  Cool on a rack and take loaves out of pans 5 minutes after taking out of oven.

Nutrition Facts (per slice if 10 slices per loaf):  182 calories, 8.2g fat (.8g saturated), 25g carbohydrate, 2.5g protein

No post on Monday due to a conference I will be at in Philadelphia!

Minestrone Soup

It was a sick, study filled weekend.  I can say I moved from the couch once or twice in 48 hours.  Unfortunately, the little germ monsters (children) at my part time job did it again.  My cold left me not caring at all about the quality of this picture of soup.  Despite the awful picture, I promise that it tastes delicious and was very comforting on a chilly fall night, sore throat or not!

It is not my recipe though so I cannot take credit for it.  It’s one of my favorite chef’s/RD, Ellie Krieger.  Next weekend through Tuesday I will be at the Academy of Nutrition and Dietetics national conference in Philadelphia (sorry, no post next Monday!), and I can’t WAIT to go to Ellie’s presentation.  Maybe I can even meet her?! I like this recipe so much that I hardly altered it at all, and it’s perfect to freeze for nights you’re feeling lazy but still want need to get your vegetable servings in :)

Minestrone Soupvery slightly adapted from Ellie Krieger, RD

Serves: 6

2 tbsp. extra virgin olive oil

1 large onion, diced

4 cloves garlic, diced

2 stalks celery, diced fairly thin

1 large carrot, diced fairly thin

1/3 lb green beans, cut into 1/2 in pieces

1 tsp. dried oregano

1 tsp. dried basil

salt and pepper, to taste

1 28 oz. can no-salt-added diced tomatoes

1 14 oz can no-salt-added crushed tomatoes

6 cups low-sodium chicken broth

1 14.5 oz can low-sodium kidney beans, drained and rinsed

1/2 cup whole wheat elbow pasta

1/3 cup grated parmesan cheese

Instructions:

  1. Dice all vegetables
  2. Heat olive oil in large pot over medium-high heat.  Add the onion and cook until translucent, about 4 minutes.  Add the garlic and cook for 30 seconds.  Add the celery and carrot and cook until begin to soften, about 6-7 minutes.  Stir in the green beans, dried oregano and basil, dash of salt and pepper (if cans are higher sodium omit the salt), cook 4-5 more minutes.
  3. Add the diced and crushed tomatoes & chicken broth, bring to a boil.  Reduce heat to medium low and simmer 10 minutes.  Stir in the kidney beans and pasta and cook about 10 minutes more.
  4. Ladle into bowls and top with parmesan cheese.

Nutrition Facts (per serving): 260 calories, 8g fat (2g saturated), 37g carbohydrate (12g fiber), 15g protein